Quick Links
BHIM (Bharat Interface for Money) app is now available for smartphone users. It is a UPI (Unified Payment Interface) based app. And you can use this app via linking your Bank account using your Bank registered mobile number. The app is officially released by Government of India, So we can ensure that BHIM is a safe, secure and reliable Cashless payment app. And if you are thinking to download, Install and activate it on your based smartphone then you go with it without any tension.
Download & Install BHIM app
BHIM app is now available for Android & iPhone smartphone users and it can be downloaded from Google Play Store and iTunes Store. So if you are an Android smartphone user then click here to go to Google Play Store, and iPhone users Go here. On Download Page click on Install button and wait for few moments and it will automatically installed.
Activate BHIM UPI app
A BHIM UPI app activation is also simple. But before to activate you will need to ensure that your mobile number with which you are going to register BHIM UPI app. Should be registered with Bank account. And any beginner can activate BHIM app via following steps
- After Download and install launch the app.
- You will see Choose Language screen, tap to select your preferred language English or Hindi and after selection tap on NEXT button.

- Now you’ll see Welcome to BHIM screen, tap on NEXT option available at the bottom right.

- Secure. Simple. Superfast. the page will appear tap again on NEXT.
- On Next Allow us to access screen will appear. Tap on LET’S GET STARTED button.
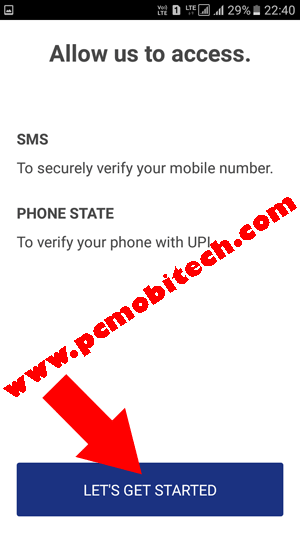
- Now if you’re using Android MarshMallow 6.0 or above version then you’ll need to allow make and manage phone calls or Send and view SMS messages permissions. And if you are using lower version Android phone then nothing will be asked to allow.
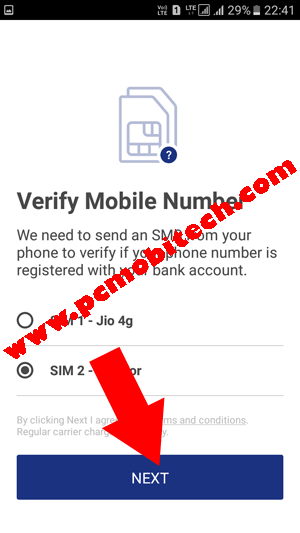
- Next, If you are using Android MarshMallow 6.0 or above version then you’ll see Verify Mobile Number screen, here select your mobile number which is registered in Bank account and tap on NEXT button.
Note:
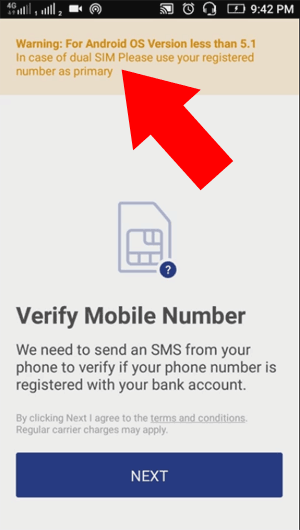
In case you have an Android Lollipop 5.1 or below version smartphone then above sim selection screen will not available for you and you’ll need to select your bank registered mobile number as SMS default. If you don’t set registered number as default for SMS then you’ll get following error:
“Warning for Android OS Version less than 5.1 in case of dual sim Please use your registered number as primary.”
To solve this error go to your Smartphone “Settings“>> SIM Card or DualSIM and In SIM Card or DualSIM settings tap Messaging (SMS message) option. Now select the main SIM which you have registered to your Bank account. After selection when you’ll tap on NEXT button on above screen app will automatically send the message from correct Mobile Number.
- A message will be sent to your registered mobile number (SMS charges will be applied) that will verify your mobile number and will be registered with BHIM app.
- Mobile Verified message will receive.
- Register Passcode screen will appear. This will protect BHIM app from unauthorized use, so create a 4 digit PIN passcode. And Don’t use your ATM/Debit Card PIN here use the separate one. After entering tap on the bottom right (√) Tick button.
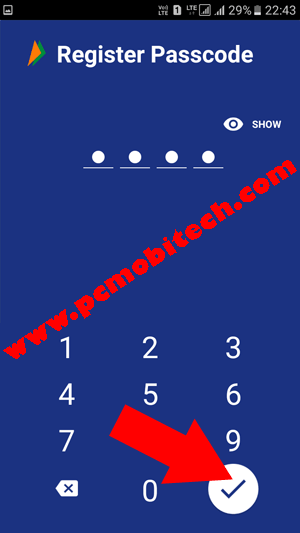
- On Next re-enter newly created 4 digit PIN to verify and then PIN will be automatically verified.
- Select Your Bank screen will appear. Here Select you Bank with which your mobile number is registered. As soon as you’ll tap on the bank BHIM app will automatically fetch your mobile number with Bank account.
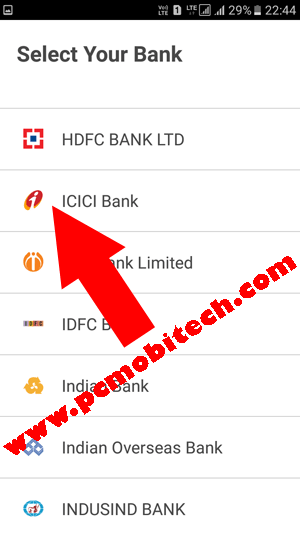
- If you have selected correct mobile number and the mobile number is linked to bank account. You will see an account on next screen. Just tap on the account to continue.

- Now BHIM app has been successfully activated.
Start Using BHIM UPI app
Before Start using BHIM app, you’ll need to know that if you have not used any UPI app yet then first you will have to SETUP UPI PIN. This PIN protects your account when you do any transaction from BHIM app. It is just like an ATM PIN as when you width-drawl money from ATM and will need to enter a PIN. Same when you’ll do any transaction on BHIM app, you’ll need to submit UPI PIN. So first setup UPI PIN:
- Launch the BHIM app and after login tap on Bank Accounts option.
- In the Bank Accounts option tap on SET UPI PIN button (if the PIN has not been setup yet).
- In the SET UPI PIN option, you’ll need to verify your debit card Last 6-DIGITS OF DEBIT Card and Valid Upto (Card Expiry) date which is print on the front side of the Debit card. After entering tap on (√) Tick button available at the bottom right.
- On next screen Enter OTP PIN which you have received on your registered mobile number (If the number is available in the same phone then it will be automatically selected). In the SET UPI PIN create 4-Digits UPI PIN (some banks allow to create 6-digits UPI PIN) and after this tap on Blue tick button.
- Next, re-enter the UPI PIN and the UPI PIN will be created successfully.
Setup UPI address
When you activate BHIM app with your mobile number, then your UPI address is mobile-number@Upi. Eg: 999999xxxx@Upi. But it is not always a good idea to share your mobile number based UPI address to all. So for the solution BHIM app also allows you to create a name based UPI address. So how to create name-based custom UPI address in BHIM app?
- Tap on Profile option.
- In the Profile tap to Add Payment Address button and create a new payment which is based on your name eg: pramod.kyc@Upi. You can also check the availability of the payment address. If your name payment address is not available then the address can be mixed with numbers as well, eg: name.5010@upi.
How to use, transfer & Receive Money
After settings up UPI PIN and name based UPI address, you can start sending or receiving money with BHIM app.
Transfer Money:
Send:
With this option, you can send money to any mobile number (which is registered to UPI supported Bank) or VPA (UPI address) or to any bank account using Account Number+IFSC code.
How to Send Money:
- Tap on SEND option available on the in the screen.
- Enter the mobile number, Aadhaar ID, UPI Payment Address in the Mobile/Aadhaar/UPI ID box.
- After entering the number, ID or UPI address tap on Verify option.
- If the Number, ID or UPI address is correct then on next screen enter the AMOUNT and tap on PAY button.
- Confirmation dialog box will appear, tap on Confirm button.
- On next enter your UPI PIN and tap on BLUE (√)Tick button.
- You’ve successfully sent the payment.
If the person doesn’t have the UPI address then you can Pay them using Account Number+IFSC code option, for this In the SEND Money option:
- Tap on the top right three-dot menu and from the menu choose the A/C+IFSC option.
- Now Enter BENEFICIARY NAME, Account Number, Confirm Account Number and Bank IFSC code, after this tap on the SEND button.
- Confirm the Payment.
- Verify UPI PIN and tap on Blue (√) TICK button.
- Payment Sent successfully.
Request:
This option will help you to get money from any UPI supported mobile number or Payment address. tap to Request option on app home screen:
- Fill Payment address where from you want to receive fund or money and tap on verify option.
- On next fill Amount & select Valid Upto date and click on REQUEST button.
- After this, a request from your UPI will be sent to requested UPI Address. And they can quickly pay you with one touch Accept payment button, from their UPI payment app.
Along with this, you can also Generate a fixed amount UPI Address QR code. So anyone can pay you by scanning this QR. To Generate a fixed amount QR code:
- In the Request option tap on top right QR code icon.
- Now fill the require Amount and tap to GENERATE QR CODE button.
- And the code will be generated. Now share this QR with anyone and receive your payment securely without sharing your Mobile Number/UPI Address.
Scan & Pay:
As I described above, this option helps you when you want to pay money to others using QR code payments. When you are making payment, then scan the QR code using this option and securely make your payments. This option works same as PayTm Pay or Send Money Scan Code option.You can also select a QR code from your memory card if your friend has sent QR code, then it can be scanned via “PICK FROM GALLERY” button. After that, verify the payment address detail enter an amount and confirm your PIN. And the transaction will be done successfully.
MY INFORMATION:
Transactions:
In the Transactions, you can get all transactions details including Pending Transactions. Along with this, if you tap on the top right three-dot menu then you’ll get My Queries, Download Transactions, Rewards, that will show you more detail and help about your transactions queries, Download transactions detail, and earned rewards.
Profile:
In the Profile, you’ll get your UPI address. With which you can pay your payments and can get a payment from others UPI apps. By default, your phone number is your UPI address, and you can add a name based UPI address. For the Name-based UPI address settings read above Setup UPI Address section.
If you want to manage my profile settings, then tap on the top right 3-dot menu and choose the Settings. In the “Profile Settings,” You can disable mobile number based UPI address (mobilenumber@upi) & USSD Service (*99#) and can edit UPI ID (Only one time you can correct your UPI ID).
Note:
USSD Service is “code dialing” Banking service, which allows you to do transactions without the Internet Connection. You’ll only need to dial *99# and press the call button. After which you will receive instructions for transacting and also you can check your account balance. For using this service, your mobile number is must registered in your Bank account.
Also See:
- Activation PayTm App and add fund to the wallet.
- WhatsApp Desktop Client: Download, Install & Activate.
Bank Accounts:
This feature will allow you to Reset UPI PIN, Change UPI PIN, Get available balance in your bank account and you can change existing bank account with another Bank account.
How to Reset or Change UPI PIN?
Tap on Bank accounts option follow the steps below:
To Reset UPI PIN:
- Tap on RESET UPI PIN option.
- Enter Last 6 Digits of debit card number and Valid Upto date and tap on Tick button.
- Next, enter the received OTP PIN, and in the SET UPI PIN create 4 or 6 Digits UPI PIN (as your bank allows), and tap on Blue tick button.
- On next page, re-enter the UPI PIN, and the UPI PIN will be reset successfully.
To Change UPI PIN:
- In the Change UPI PIN settings, Enter your Current UPI PIN.
- And create a new PIN using SET UPI PIN. After this tap on Blue (√) Tick button.
- Next, re-enter your new UPI PIN to Confirm UPI PIN. And again tap on (√) tick button.
- Now your newly created UPI PIN has been successfully setup.
Check Account Balance
- In The Bank Accounts tap on REQUEST BALANCE button.
- On next enter your UPI PIN and tap on BLUE (√) tick button.
- Now you will see total available balance in your Bank Account.
Change Bank Account to another Bank?
- In the Bank Accounts tap on the top right Three-dot menu.
- Choose Change Account option from the menu.
- Now tap on PROCEED button.
- Select your Bank from the List.
- If you have an account in the selected bank, then the linked bank account will appear.
- Tap to select your bank account. Your account is now successfully linked to BHIM app.
How much money can we transact with BHIM app?
There is a limit has been currently set on the BHIM app, and you can spend upto Rs. 10000 per transaction and Rs. 20000 per day.
BHIM app Update:
1. BHIM app supports Multiple-languages: Hindi, English, Bengali, Gujarati, Kannada, Malayalam, Oriya, Tamil and Telugu.
- To Change your language at the Home screen tap on the top right three-dot and tap on Choose Language option. And select preferred language from list tap on Next your language will be changed.
2. Change SIM option available, so if you’re using a dual sim phone and want to use BHIM app with another sim, then you can re-register the second sim.
- To use BHIM app with another SIM, at the home screen tap on the top right 3-dot and choose Change SIM option. And after this tap on CONFIRM button and follow the steps.
3. Now you can reset your Password if you have forgotten, then it can be recovered using Forgot Passcode? option. This option is now available on Enter Passcode screen.
- If you want to reset your BHIM app Passcode then at Passcode screen tap on Forgot Passcode? Option and tap on PROCEED button. (You’ll need to verify your Mobile number and your account number again, and after then you can reset your BHIM app four-digit password.)
Any Question related to BHIM app activation?



how to change the limit of amount per day
I had problem installing BHIM app
I was using the app from the day one it was launched by Modiji
The app was working fine (and is quite simple and useful)
Few days back i had message by Google Playstore to update certain apps as new updated versions are available. So i updated the apps
But after updating apps, Bhim app failed to start, it only shows the first screen.
I tried many times but still unable to use the app so i decided to uninstall the app and install the previous version of the app but Play Store had only the latest version, so i downloaded the app from external website (it had all the previous versions)
The app functions properly but at time of verifying the mobile number it shows error. & asks to verify the mobile number again.
I downloaded the Bhim app from play store but it does’nt starts it just shows the first screen.
I tried several times but still no success..
Kindly guide me how can i solve this problem..
You should contact to app support team. Send your problem on their support email: contact.bhim@npci.org.in and also write a review in the Playstore Bhim app page Write here. Read more: How to Report app error to app developer?.
When I click register mobile number verification in my jio sim I have receive a unwanted incoming msg .. what I can do
How to register SBI maestro account in SBI bhim app, when I bank select state bank of India, then bhim app denied, and reply me not to allowed asper policy. Please help me how to register/add in SBI account in SBI bhim app
In case of dual SIM – both the SIM are registered with different Banks. I have successfully used BHIM on primary SIM. How do I use this app on my other SIM ? Do I have to remove & reinstall, after removing primary SIM ?
Hi Anil,
You can use BHIM app only with Primary SIM if you have registered it with Primary. If you want to use secondary SIM with BHIM app then Uninstall BHIM from your phone and register it with Secondary SIM. However if you don’t want to remove it from your phone then install another BHIM app into your existing phone using Parallel Space app. Download it from Google Play Store and install BHIM app into this then register it with Secondary SIM.
Yes required passcode
After creating 4 digit paas code it shows all banks name but while touching any one of them it’s responding ‘transaction declined’. So how can I use BHIM app?
Have you Created UPI PIN.
Transaction decline / account doesn’t exit
It may Be a bug. Will be fixed soon.
Sending otp by dena bank is 4 digits but required is 6 digits password for setting upi pin .
What I do for this problem?
OTP PIN is only for the verification of the UPI PIN setup. IF Dena Bank allows you to create 6 digits UPI PIN then you can create without any problem. If the BHIM app asking 6 digits OTP code and you have received 4 digits OTP code. Then contact to the Dena bank customer care number they will assist you better than anyone.