Location Services on an iPhone can be very helpful, enabling apps to give you directions, show local weather, and even tag where you took your photos. But if you’re concerned about privacy, battery life, or just want more control over which apps can track your location, you may want to turn off Location Services or manage it on a per-app basis. This guide will walk you through how to do that, simply and effectively.
Quick Links [show]
What Are Location Services on an iPhone?

Location Services use GPS, Wi-Fi, and even nearby cell towers to determine where your iPhone is. They’re used by apps like Maps to give directions, by Weather to give you local forecasts, and by social media apps to add location tags. They can be useful, but they also mean your location is tracked, which not everyone is comfortable with.
Why Turn Off Location Services?
Turning off Location Services can offer some advantages:
- Privacy: Disabling Location Services stops apps from knowing where you are and limits data shared with third parties.
- Battery Life: Constantly tracking your location drains your battery. Disabling this feature, especially for certain apps, can extend your phone’s battery life.
- Less App Access: Some apps don’t actually need your location data to work, so turning off their access can simplify your digital footprint and potentially speed up your device a bit.
How to Turn Off Location Services Entirely
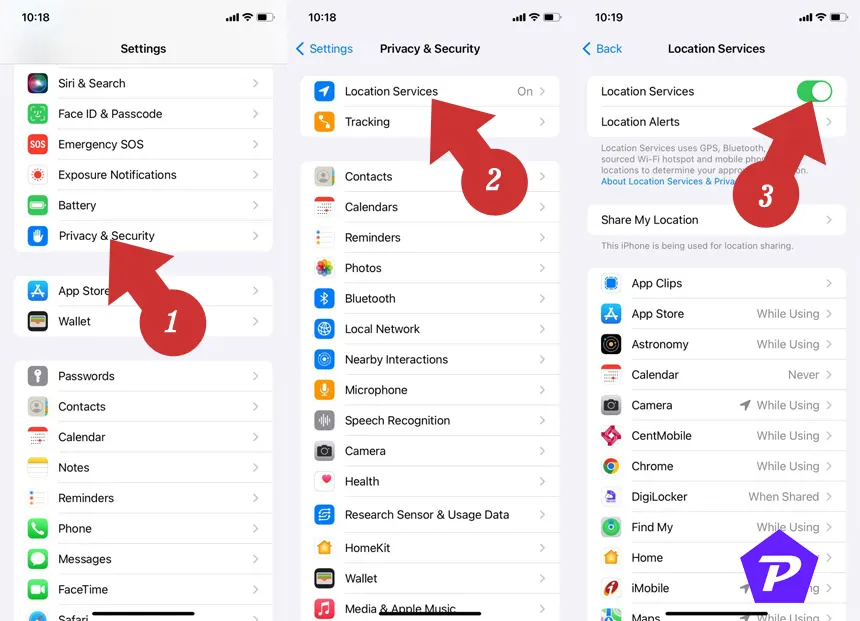
If you want to completely turn off Location Services on your iPhone, here’s how:

- Open Settings: Go to the Settings app.
- Go to Privacy & Security: Scroll down and tap on Privacy & Security.
- Select Location Services: At the top, tap on Location Services.
- Turn Off Location Services: Toggle off Location Services at the top of the screen. Confirm when prompted.
This will turn off all location tracking for apps and services on your iPhone. Just remember that doing this might impact the functionality of apps that rely heavily on location, like Maps.
How to Manage Location Services for Individual Apps
If you don’t want to disable Location Services entirely, you can choose which apps can access your location. Here’s how:
- Open Settings: Go to Settings > Privacy & Security > Location Services.
- Choose the App: You’ll see a list of all apps that use location data. Tap on an app to adjust its settings.
- Set Location Access:
- Never: Blocks location access for this app.
- Ask Next Time: The app will ask for permission each time it wants to use your location.
- While Using the App: Allows location access only when the app is open and on your screen.
- Always: Grants the app constant access to your location, even in the background. (This is limited to specific apps.)
For example, you might want Maps to use your location While Using the App but set social media apps to Never to avoid unnecessary tracking.
Managing System Services that Use Location Data
Certain system features on your iPhone also use your location, like Find My iPhone and Emergency SOS. Here’s how to control these:
- Go to Location Services: In Settings > Privacy & Security > Location Services, scroll down to System Services.
- Review Each Option: Here, you can choose which system services you want to allow, like location-based alerts or ads. Toggle off any you don’t need.
Turning off unnecessary system services can further boost privacy and reduce location tracking.
Clearing Your Location History
Your iPhone keeps a record of places you often visit. If you want to clear this data:
- Go to Settings: Open Settings > Privacy & Security > Location Services.
- Open System Services: Scroll down and tap System Services > Significant Locations.
- Clear History: From here, you can delete your location history by tapping Clear History.
Turning off Location Services on your iPhone is a simple way to take control of your privacy, reduce battery drain, and limit unnecessary app access. Whether you turn it off entirely or manage it for each app, you’ll have more control over what your iPhone shares and when.
When you purchase through links on our site, we may earn an affiliate commission. Read our Affiliate Policy.


