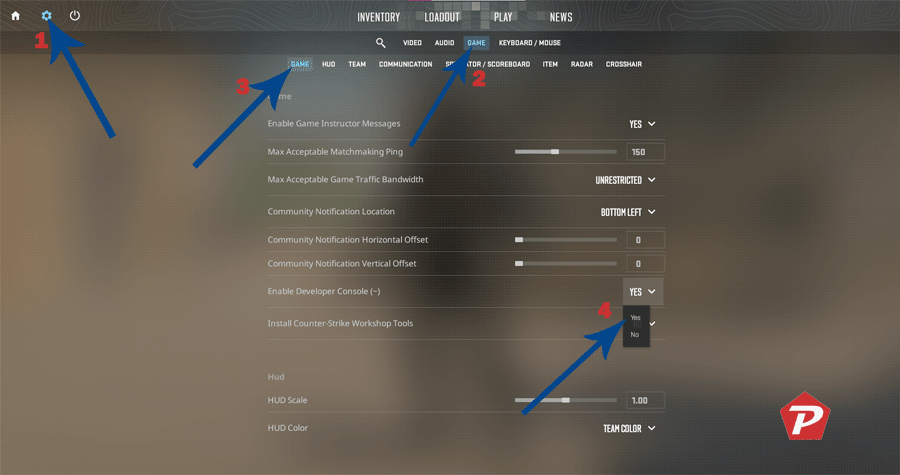
Valve’s upcoming game, CS2 (Counter-Strike 2), is set to be released this summer and is built on the Source 2 engine, promising an improved gaming experience and performance. We recently received an invitation to participate in the limited beta test of CS2 and attempted to enable the Developer Console. Interestingly, we discovered that the process of activating the Developer Console remains unchanged from CS:GO (Counter-Strike Global Offensive).
For those who are new to CS and would like to know how to enable the developer console in CS2, here are the steps.
What Is The Use Of Developer Console in CS
The Developer Console in CS (Counter-Strike) games, including CS2, is a really useful tool for both players and developers. It’s like a special command center where you can type in different commands and settings to make changes in the game. Here are some of the things you can do with the Developer Console in CS: Customization, Debugging and Testing, Cheats and Commands, Server Administration, Modding and Custom Content, etc.
In summary, the Developer Console in CS games is a powerful tool that lets players and developers do all sorts of interesting things, like customizing the game, fixing bugs, using cheats, managing servers, and creating new content.
Steps to Enable Developer Console in CS2
If you want to learn how to activate the developer console in CS2, here’s a simple guide:

- Launch CS2 and navigate to the main menu.
- Click on Top Left “Settings” (gear icon.)
- Look for a tab or menu option called “Game” Settings.
- Within the Game Settings click on “GAME” option (if it is not already selected).
- Locate the “Enable Developer Console” and click on drop down menu.
- From the menu select the option “Yes.”
- After settings up Yes for Developer console, it is now ready to use.
Once the developer console is enabled, you can access it by pressing the designated key on your keyboard, usually the tilde (~) key. This will open the console, allowing you to enter commands and modify various aspects of the game.
When you purchase through links on our site, we may earn an affiliate commission. Read our Affiliate Policy.


