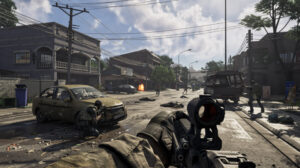
“Gray Zone Warfare” is a favorite among FPS enthusiasts on Steam. With its unique combination of PvE and PvEvP modes, it’s no wonder why so many players are hooked. Yet, like many early-access games, it’s not without its problems. One of the main complaints from the gaming community is screen flickering or tearing, which can seriously disrupt the experience.
Screen flickering can make the game seem unstable, while tearing splits the visuals, causing frustration and distraction. These issues are common across many PC games, but you don’t have to put up with them. In this article, we’ll guide you through 10 effective ways to fix these problems in “Gray Zone Warfare.”
Quick Links
- What Causes Screen Flickering or Tearing?
- 1. Enable V-Sync in Nvidia Control Panel
- 2. Adjust In-Game Graphics Settings
- 3. Update GPU Drivers
- 4. Close Unnecessary Background Applications
- 5. Check Your Internet Connection
- 6. Update the Game to the Latest Version
- 7. Verify the Integrity of Game Files
- 8. Set High-Performance Mode in Power Options
- 9. Set Game to High Priority in Task Manager
- 10. Update Windows Operating System
- Additional Tips to Prevent Screen Flickering
What Causes Screen Flickering or Tearing?
Before diving into solutions, let’s understand what causes these issues:
- Graphics Card Struggles: When your graphics card can’t keep up with the game’s frame rate, you might see tearing.
- Incorrect Settings: Inaccurate in-game settings or wrong monitor configurations can contribute to flickering.
- Network Lag: Unstable internet can also lead to visual glitches, especially in multiplayer modes.
Now, let’s get into the solutions!
1. Enable V-Sync in Nvidia Control Panel
One of the easiest and most effective fixes for screen tearing is enabling Vertical Sync (V-Sync) in the Nvidia Control Panel:
- Open the Nvidia Control Panel from the Start Menu.
- Go to 3D Settings > Select Manage 3D settings.
- Click on Program Settings and add “Gray Zone Warfare.”
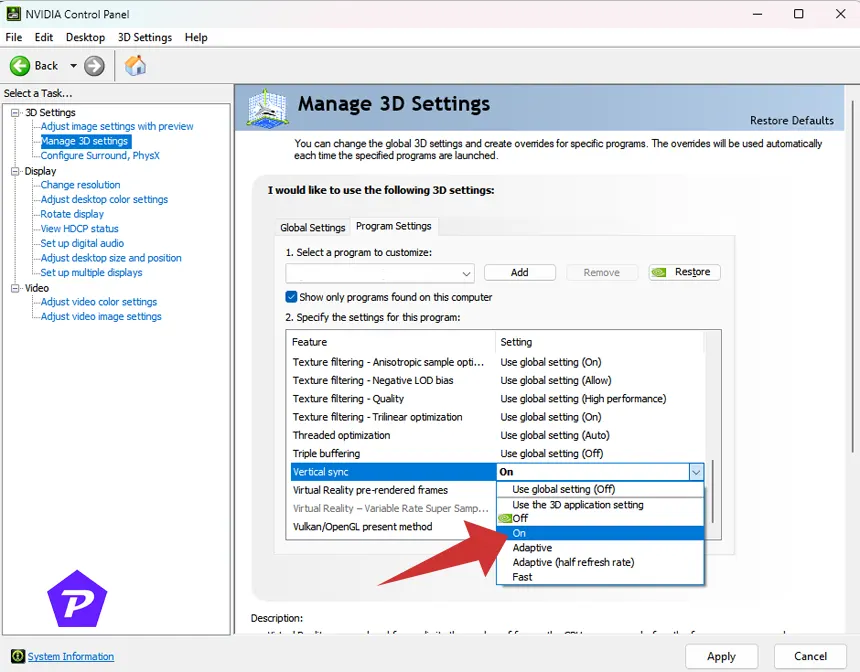
- Locate the Vertical sync setting and turn it On.
- Click on “Apply” Button.
- Restart your PC and see if the problem is resolved.
This setting ensures that your graphics card synchronizes with your monitor’s refresh rate, eliminating tearing.
2. Adjust In-Game Graphics Settings
Sometimes, all you need is a tweak in the game’s graphics settings:
- Open Gray Zone Warfare and navigate to Settings.
- Lower texture details, shadows, anti-aliasing, and turn off V-Sync if it’s causing problems.
- Apply the changes and restart the game.
Lowering settings reduces the strain on your hardware, minimizing flickering.
3. Update GPU Drivers
Keeping your graphics drivers up-to-date is essential:
- Press Windows + X and select Device Manager.
- Expand Display adapters and right-click on your GPU.
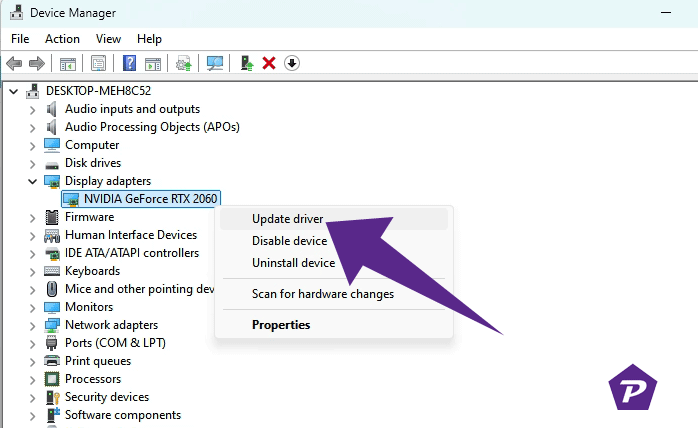
- Choose Update driver and select Search automatically for drivers.
- If updates are found, install them and reboot your PC.
Updated drivers can significantly enhance performance and fix bugs.
4. Close Unnecessary Background Applications
Background apps consume system resources, leading to performance drops:
- Press Ctrl + Shift + Esc to open Task Manager.
- End tasks that aren’t crucial, like browsers or media players.
- Restart your computer and try playing the game again.
This frees up memory and processing power for the game.
5. Check Your Internet Connection
A weak or unstable internet connection can also cause screen issues:
- Use a wired connection instead of Wi-Fi for better stability.
- Switch to Google DNS by going to Network & Internet Settings > Change Adapter Options > Properties > Internet Protocol Version 4 (TCP/IPv4).
Stable internet ensures smoother gameplay, especially in online modes.
Read More: Best DNS Servers for Grand Theft Auto V.
6. Update the Game to the Latest Version
An outdated game version may harbor bugs:
- Open the Steam client.
- Go to Library > Select Gray Zone Warfare.
- If an update is available, click on Update.
- Restart your PC and launch the game.
Updating can fix issues and improve game stability.
7. Verify the Integrity of Game Files
Corrupted or missing files can cause visual glitches:
- Open Steam and go to Library.
- Right-click on “Gray Zone Warfare” > Properties > Installed Files.
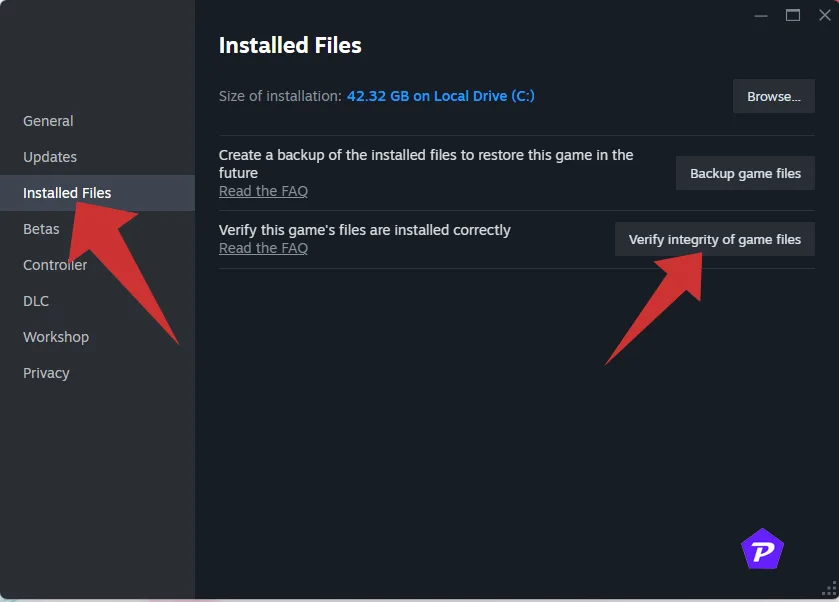
- Click Verify Integrity of Game Files.
- Restart your computer once the process is complete.
This step restores missing or damaged game files.
8. Set High-Performance Mode in Power Options
Ensure your PC is running at its best:
- Open Control Panel > Hardware and Sound > Power Options.
- Select High Performance.
- Restart your system.
This setting allows your computer to use maximum power for demanding tasks like gaming.
9. Set Game to High Priority in Task Manager
Boost the game’s priority to improve performance:
- Open Task Manager and go to the Processes tab.
- Right-click on “Gray Zone Warfare” and select Set Priority > High.
- Close Task Manager and launch the game.
This tells your system to allocate more resources to the game.
10. Update Windows Operating System
Updating Windows can resolve compatibility issues:
- Press Windows + I to open Settings.
- Go to Update & Security > Windows Update.
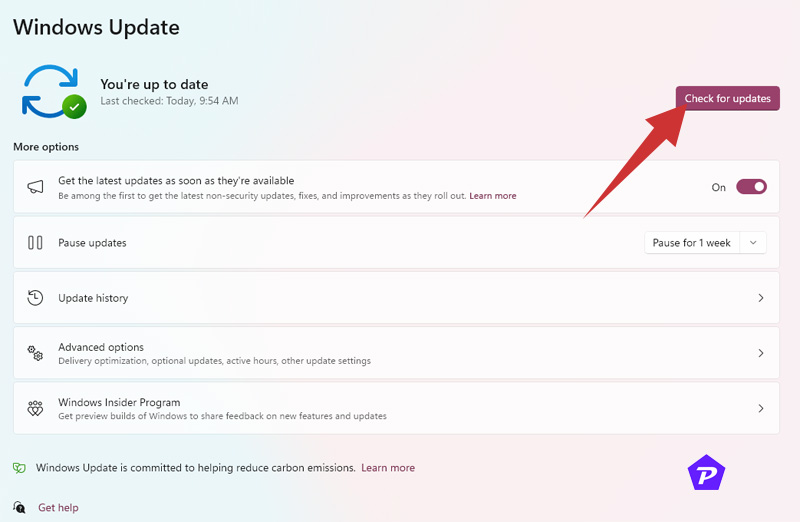
- Click Check for updates and install if available.
- Restart your PC to apply the updates.
Keeping your OS updated helps maintain overall system health.
Additional Tips to Prevent Screen Flickering
Here are some extra tips to keep your screen stable:
- Check and adjust your monitor’s refresh rate to match your GPU.
- Use Borderless Window Mode instead of Full Screen for better stability.
Conclusion
There you have it—10 effective ways to tackle screen flickering or tearing in “Gray Zone Warfare.” By following these steps, you should see a significant improvement in your gameplay experience. Remember to update both your game and your system regularly to prevent new issues from cropping up. Happy gaming!
When you purchase through links on our site, we may earn an affiliate commission. Read our Affiliate Policy.

