Are you using a battery saver app on your Android phone? Does it help increase phone battery life? If you are unsure whether a battery-saving app can enhance your Android smartphone’s battery life, read this article to gain a better understanding.
When we purchase an Android phone, everyone recommends installing a good battery saver to enhance battery life. But does it really help? Let me explain.
Quick Links
What Can A Battery Saving App Do?
Before installing a battery-saving app, let’s analyze what it can do for us. Most battery-saving apps perform the following tasks:
Ram Cleaner:
As we all know, Android smartphone apps keep running in the background, which continues to drain the battery life. If we don’t stop them, the phone battery will perform 20% to 30% less than normal. Due to this, all battery-saving utilities come with a Ram cleaner option.
Must Check: Enable battery saver & increase battery life with Opera Browser PC.
Screen Backlight
Screen backlight is a huge battery-hungry source. Whenever you use high contrast or brightness for a better viewing experience, it will drain the battery at a very high speed. So, a battery saver will remind you to reduce screen backlight according to the daytime. Battery saver analyzes daylight for your backlight using the light sensor and reduces it to the necessary level.
If the Light Sensor is not available on your phone, then a good battery saver uses your phone time to determine your daylight. And it will increase the light in the day and decrease it at night. So, it will save more battery using this smart technique.
Sound Volume & Vibration.
Unwanted sounds and vibrations also use some power of your battery. If you take care of it, the phone battery can be saved more. There are many options available for different sound volume and vibration control: Media, Alarm, Ring, Notification, DialPad Tones, Screen Locking sound, Touch sound & Call volume, etc. And Vibration on call & messages, Vibrate on touch, etc. If you use a smart battery saver, it will help you control unwanted sound volume and vibration.
Disable Unwanted Running Services.
We enable Data Connection, WiFi, WiFi hotspot, Bluetooth, and Location service according to our needs. But many times we forget to disable these; then, a battery saver will remind you to disable any opened feature.
Do you really need a Battery Saving app?
It entirely depends on you; if you can perform all these tasks manually, there is no need to install a battery saver. While a battery saver does contribute to increased phone battery life, its impact is not as significant as when performed manually.
As you are aware, background apps consume additional battery power. Therefore, a substantial portion of your battery drainage results from these background processes. Installing a battery saver introduces another app running in the background, which, while providing assistance, also utilizes extra power. Consequently, it’s essential to consider whether you genuinely require a battery-saving app.
Must Read this: How to Block calls with Avast Mobile Security & Antivirus app.
Increase Phone Battery Life without Battery Saver?
It is not very challenging, especially if you have basic knowledge about your smartphone and can manage your phone settings. Here, I’m sharing a few tips that can help extend your phone battery life:
Cleaning your Ram memory:
As mentioned earlier, a battery saver regularly prompts you to clean background running apps. However, if you prefer to do this manually, there are a couple of ways to achieve it:
1. Using Overview button:
This button, also known as the Task Switcher or Recent Apps button, is one of the three buttons on Android smartphones, alongside Back and Home.

When you tap the Overview button, you’ll see a list of recently opened applications, with a “CLOSE ALL” or “Clear All” button. Clicking this button will stop all running apps.
Also Check: 5 Video Players that can play all Videos & AC3 audio.
2. Via Running apps in Application Manager:
For Android 5.0 Lollipop or earlier versions, you can access the Running apps option in the Application Manager, where you’ll find a list of all running apps. You can force stop any app to immediately terminate its running process. To access Running apps on Android 5.0 or earlier, go to Settings >> Apps (Application Manager) >> tap on the RUNNING tab.
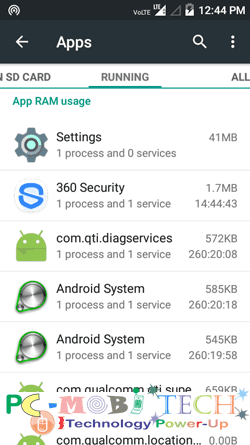
However, in Android 6.0 Marshmallow and Android 7.0, this option has been moved to Developer options. To enable Developer options, go to smartphone Settings >> About Device >> Software info >> tap on Build number up to 5 times to enable Developer options. Afterward, go to Settings >> Developer Options >> Running Services.
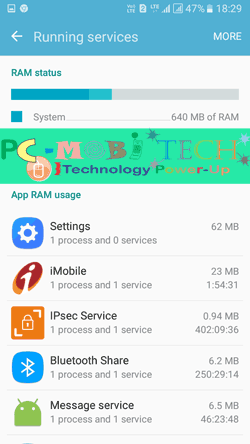
If numerous apps are running in the background, tap on any app and then tap on the “STOP” or “FORCE STOP” button to terminate the running app process.
3. Built-in RAM Cleaner Option:
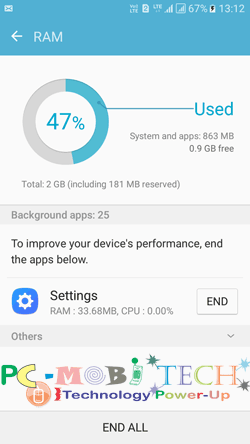
Some smartphones come with a variety of features, such as Smart Manager (found in the Samsung Galaxy MarshMallow 6.0 phone series), which offers a built-in RAM Cleaner option.
Manage Backlight Brightness Level:
If you reduce your screen brightness then it’ll help to save some extra battery power and So your phone will run more hours than in High Brightness mode. To make changes in Brightness Go to Settings >>Display>> Brightness and reduce your screen brightness.
Reducing your screen brightness helps conserve extra battery power, allowing your phone to run for more hours than in High Brightness mode. To adjust brightness, go to Settings >> Display >> Brightness and decrease your screen brightness.
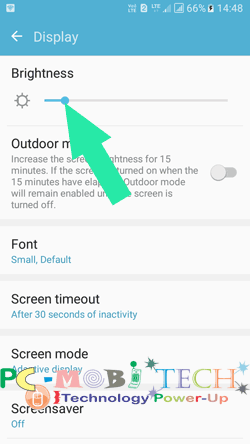
Some phones come with an Auto Brightness mode. If your phone has this option, you won’t need to manually manage your screen backlight brightness level, as this feature will automatically adjust your screen brightness.
Control Sound Volume & Vibration:
As mentioned earlier, there are various options available for sound and vibration. Disabling unnecessary options contributes to increased phone battery life. Go to Settings >> Sound & Notification (Sounds & Vibrations).
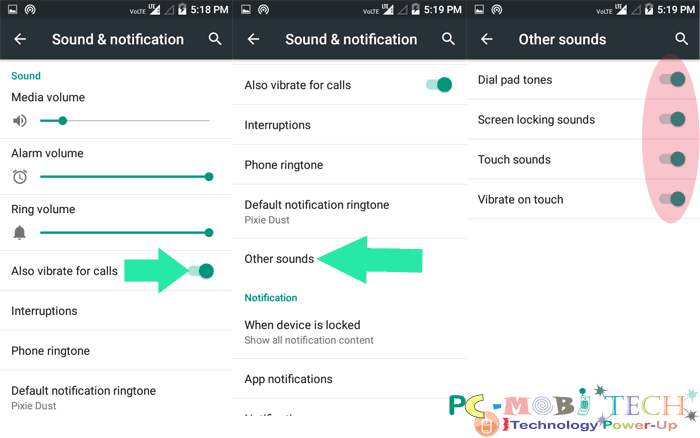
In the Sound & Notification (Sounds & Vibrations) section, you can disable vibration for calls or similar options. After this, you can turn off Vibrate on touch, screen locking sound, touch sound, etc. Sometimes these options are available in the main Sound & Notification option window or in the Other Sounds option, depending on your Android version.
If you can manage all these tasks manually, it will be much better for your phone than using a battery saver. I believe I have covered everything, but in case I missed something, please suggest it in the comment box. Also, don’t forget to read this topic: 5 Battery-saving Tips for Android Smartphone Users.
When you purchase through links on our site, we may earn an affiliate commission. Read our Affiliate Policy.



Nice article – better than I was expecting about battery saving app for android mobiel..it’s very helpful for all android users.Thanks for such post and please keep it up.!!!!!!
Really awesome article about battery saving app for android phone..Glad i found this.
Great article, Thanks for sharing with us.