The Windows Snipping Tool has long been a staple for anyone looking to quickly capture a screenshot. But did you know that this seemingly simple tool has evolved beyond basic screenshots? From screen recording capabilities to Optical Character Recognition (OCR), Windows has introduced features to make the Snipping Tool more versatile and powerful than ever. Let’s dive into five hidden features of the Windows Snipping Tool that can revolutionize your screen capturing experience.

Quick Links
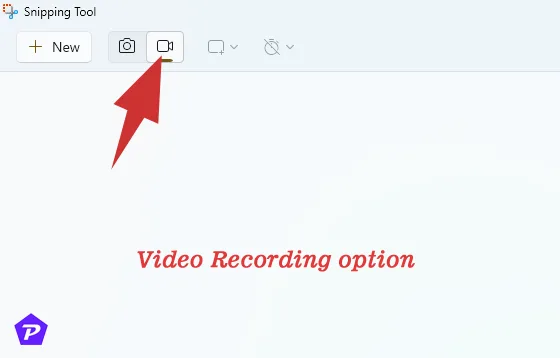
1. Capture Video and Microphone with Screen Recording
The Snipping Tool now includes screen recording capabilities, turning it into more than just a screenshot tool. This feature, only available in recent Windows updates, allows users to record specific sections of their screen effortlessly.
Benefits of Screen Recording in the Snipping Tool
Screen recording in the Snipping Tool is straightforward, letting users define the recording area—unlike the Xbox Game Bar, which previously only allowed full-screen capture. This feature is ideal for anyone needing to create tutorials, presentations, or training videos.
How to Use Screen Recording in Snipping Tool

- Open the Snipping Tool and select the “Record” option.
- Now, click on the “+ New” option.
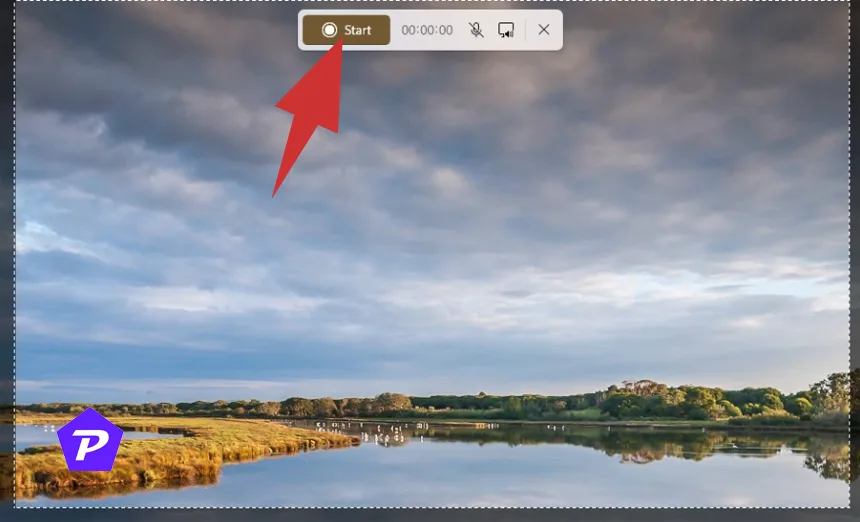
- Drag to define the area you want to capture.

- Select your preferred audio input, such as a lapel mic, to capture narration.
- Start recording, and when done, the video will automatically save to your chosen location.
The Snipping Tool also offers a setting to disable system sounds, eliminating distractions like click noises. This can be especially helpful for educators, tutorial creators, or remote workers recording instructional content.
Shortcut to ClipChamp
While the Snipping Tool doesn’t have built-in editing, it offers a shortcut to ClipChamp, a user-friendly video editor. ClipChamp allows for quick trimming, adding captions, and inserting other visual elements to polish recordings before sharing or publishing them.
Also Read:
- 5 Best Screen Recording Software for Windows.
- 5 Best Screen Capturing Tools for Windows Free & Paid
- How to Take Screenshots In Windows Without Snipping Tool?
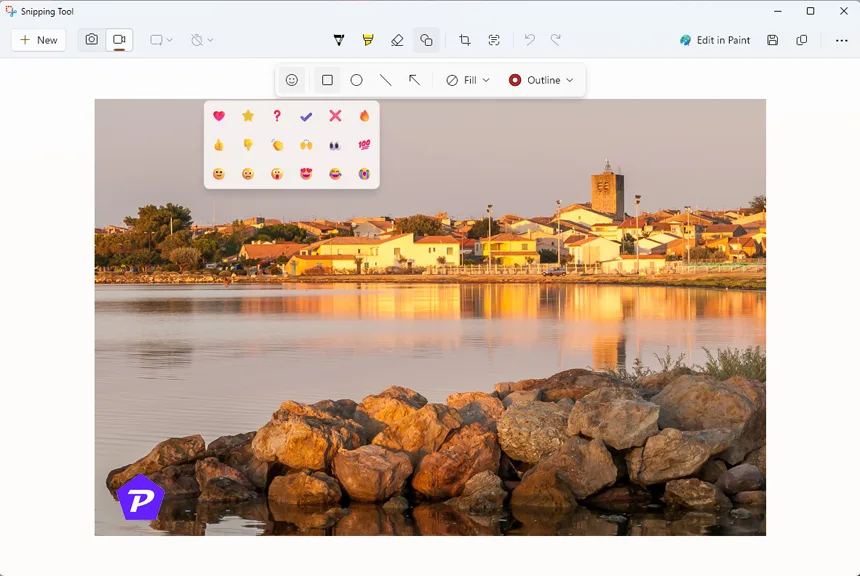
2. Annotate Screenshots with Shapes and Emojis
Gone are the days of using Paint to mark up screenshots. The Snipping Tool now includes shape and emoji annotations to help emphasize key points in your images without needing any additional software.
Adding Shapes and Emojis to Your Snips

- Take a screenshot and open it in the Snipping Tool.
- Select the “Shapes” option, where you’ll find circles, squares, arrows, and other annotation tools.
- For extra flair, add emojis to make explanations or feedback more engaging.
Using these shapes and emojis is intuitive, letting you highlight specific areas of a screenshot quickly. The emoji addition is particularly useful for teachers or communicators who want to make visual content more engaging.
Practical Applications of Shape and Emoji Annotations
Shape and emoji annotations can be a game-changer for different users:
- Educators: To mark key points or highlight mistakes in instructional materials.
- Corporate Training: Annotate process screenshots with icons that make steps clear.
- Content Creators: Spice up your guides or tutorials with visual cues.
This feature removes the need for external tools, streamlining your workflow and saving valuable time.
3. Identify and Copy Text from Images Using OCR
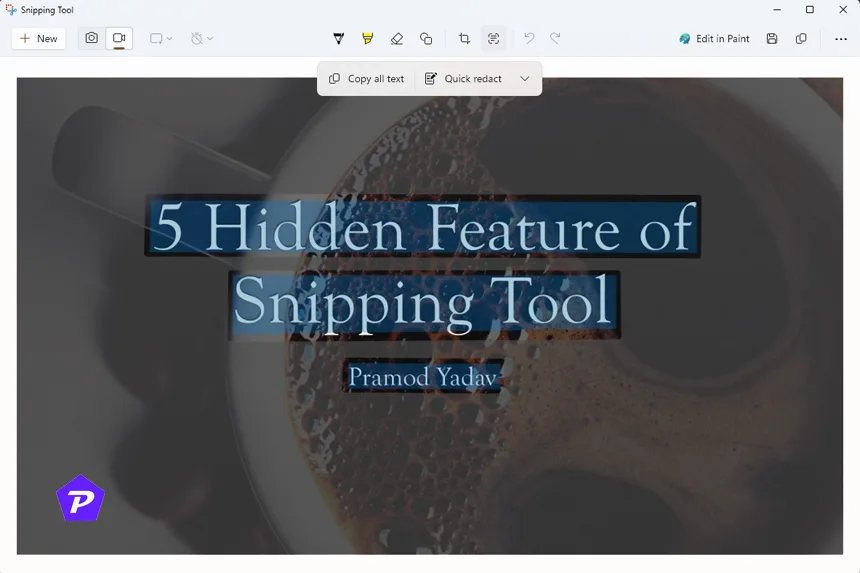
One of the most powerful updates to the Snipping Tool is its OCR (Optical Character Recognition) capability, which can identify and copy text from any image. Previously, extracting text from images required third-party software or online tools, but now, the Snipping Tool makes this effortless.
How to Use OCR in the Snipping Tool

- Capture an image containing text using the Snipping Tool.
- Click on the “Text Actions” feature to start text recognition.
- Once the text is identified, you can highlight and copy it directly.
This is a powerful feature for quickly capturing information from complex documents or images containing text data.
Common Uses for OCR
The OCR functionality can be particularly helpful in these scenarios:
- Digitizing Documents: Quickly scan and save text from printed documents.
- Copying Information from Screenshots: Extract contact details, website addresses, or other critical info from an image.
- Creating Editable Tables: Some users report successfully capturing entire tables, though results may vary depending on the image quality.
Microsoft is reportedly working on an upgrade to enhance OCR’s accuracy, including the ability to capture more complex tables with ease.
4. Scan QR Codes Directly from Images
Scanning QR codes is another hidden feature that makes the Snipping Tool stand out. While it’s common to scan QR codes with a phone, doing it on a Windows PC has typically required third-party software or transferring the image to your mobile device. Now, the Snipping Tool can detect QR codes from images directly.
How to Scan QR Codes with the Snipping Tool
- Open an image containing a QR code in the Snipping Tool.
- Let the OCR function detect the QR code and interpret the embedded URL or text.
- Copy the text or open the link directly in your browser.
This is a useful feature for anyone working with digital tickets, documents, or instructions that rely on QR codes, eliminating the need for phone-based scanning.
Applications of QR Code Scanning in Windows
- Event Check-Ins: Quickly access QR-based event tickets directly from your PC.
- Link Sharing: If you receive a QR code link, you can open it immediately without transferring it to another device.
- Product Information: Some product manuals or instructions come with QR codes for additional online resources, which can now be accessed seamlessly on your PC.
5. Perform Visual Searches for More Information
The Snipping Tool includes a lesser-known feature called Visual Search, powered by Bing. This allows users to search for similar images or information related to an image they’ve captured.
How to Use Visual Search in the Snipping Tool
- Capture an image using the Snipping Tool.
- Click on the three dots in the upper-right corner of the tool and select “Visual Search with Bing.”
- Bing will open a new window, showing related images and potentially more details about the content.
This feature can be particularly useful for anyone working on research projects, DIY tasks, or shopping recommendations, as it provides similar image searches without needing to navigate away from the Snipping Tool.
When Visual Search Can Be Handy
Visual Search comes in handy in several scenarios:
- Shopping Comparisons: Find similar products or related items quickly.
- Research Projects: Identify objects or landmarks in educational material or reports.
- Media Analysis: Search for background information on a photo or video frame for context.
While Visual Search doesn’t always provide perfect results, it’s an excellent quick reference tool built directly into the Snipping Tool.
The Snipping Tool in Windows has come a long way from its origins as a simple screenshot tool. With the recent updates, Microsoft has transformed it into a multi-functional application that caters to more than just basic screen captures. From recording videos to capturing text, scanning QR codes, and performing image searches, the Snipping Tool now provides an impressive suite of features. For Windows users who rely on visual data, these upgrades eliminate the need for third-party tools, streamlining tasks and making the Snipping Tool an all-in-one solution.
FAQs
1. Can I edit videos directly within the Snipping Tool?
No, the Snipping Tool doesn’t offer direct video editing options. However, it provides a shortcut to ClipChamp, where you can edit recordings before finalizing them.
2. Is OCR available in all versions of the Windows Snipping Tool?
OCR is available in the latest updates of the Windows Snipping Tool on Windows 10 and 11. Ensure your system is updated to access this feature.
3. Can I record audio with the Snipping Tool’s screen recording feature?
Yes, you can choose audio input from your microphone while screen recording with the Snipping Tool, adding narration to your videos.
4. How accurate is the Snipping Tool’s Visual Search with Bing?
Visual Search with Bing provides good results for general items but may vary in accuracy depending on the image quality and search parameters.
5. Can I use the Snipping Tool for free?
Yes, the Snipping Tool comes pre-installed with Windows, making it free to use without the need for additional software.
When you purchase through links on our site, we may earn an affiliate commission. Read our Affiliate Policy.


